springboot入门笔记
说明:文章内容来源于[猿说教育]。
Spring Boot 入门
Spring Boot 是 Spring 社区较新的一个项目。该项目的目的是帮助开发者更容易的创建基 于 Spring 的应用程序和服务,让更多人的人更快的对 Spring 进行入门体验,让 Java 开发也 能够实现 Ruby on Rails 那样的生产效率。为 Spring 生态系统提供了一种固定的、约定优于配 置风格的框架。
Spring Boot 具有如下特性:
- 为基于Spring的开发提供更快的入门体验
- 开箱即用,没有代码生成,也无需XML配置。同时也可以修改默认值来满足特定的需
求。 - 提供了一些大型项目中常见的非功能性特性,如嵌入式服务器、安全、指标,健康检测、
外部配置等。 - SpringBoot并不是对Spring功能上的增强,而是提供了一种快速使用Spring的方式。
简单例子
首先创建一个一般的 Maven 项目,有一个 pom.xml 和基本的 src/main/java 结构。
pom.xml 文件
1 | <project xmlns="http://maven.apache.org/POM/4.0.0" xmlns:xsi="http://www.w3.org/2001/XMLSchema-instance" xsi:schemaLocation="http://maven.apache.org/POM/4.0.0 http://maven.apache.org/xsd/maven-4.0.0.xsd"> |
对 pom 的说明
首先是增加了spring-boot-starter-parent 包含了 大量配置好的依赖管理,在自己项目添加这些依赖的时候不需要写
使用父 pom 虽然简单,但是有些情况我们已经有父 pom,不能直接增加
1 | <dependencyManagement> |
关于 java.version 属性
上面 pom.xml 虽然没有出现这个属性,这里要特别提醒。
Spring 默认使用 jdk1.6,如果你想使用 jdk1.8,你需要在 pom.xml 的属性里面添加 java.version, 如下:
1 | <properties> |
添加 spring-boot-starter-web 依赖
Spring 通过添加spring-boot-starter-*这样的依赖就能支持具体的某个功能。 我们这个示例最终是要实现 web 功能,所以添加的是这个依赖。
更完整的功能列表可以查看:Using-boot-starter-poms
添加 spring-boot-maven-plugin 插件
该插件支持多种功能,常用的有两种,第一种是打包项目为可执行的 jar 包。
在项目根目录下执行 mvn package 将会生成一个可执行的 jar 包,jar 包中包含了所有依 赖的 jar 包,只需要这一个 jar 包就可以运行程序,使用起来很方便。该命令执行后还会保留一个 XXX.jar.original 的 jar 包,包含了项目中单独的部分。
生成这个可执行的 jar 包后,在命令行执行 java -jar xxxx.jar 即可启动项目。
另外一个命令就是 mvn spring-boot:run,可以直接使用 tomcat(默认)启动项目。 在我们开发过程中,我们需要经常修改,为了避免重复启动项目,我们可以启用热部署。
spring-loaded 热部署
Spring-Loaded 项目提供了强大的热部署功能,添加/删除/修改 方法/字段/接口/枚举等 代码的时候都可以热部署,速度很快,很方便。
想在 Spring Boot 中使用该功能非常简单,就是在 spring-boot-maven-plugin 插件下面添 加依赖:
1 | <!-- 支持热部署 --> |
添加以后,通过 mvn spring-boot:run 启动就支持热部署了。 注意:使用热部署的时候,需要 IDE 编译类后才能生效,你可以打开自动编译功能,这样在 你保存修改的时候,类就自动重新加载了。
创建一个应用类 我们创建一个 Application 类:
1 |
|
注意
Spring Boot 建议将我们 main 方法所在的这个主要的配置类配置在根包名下。
1 | com |
在 Application.java 中有 main 方法。 因为默认和包有关的注解,默认包名都是当前类所在的包,例如@ComponentScan, @EntityScan, @SpringBootApplication 注解。(都是安当前 Application.java 所在包作为 Scan 扫 描)
@RestController
因为我们例子是写一个web应用,因此写的这个注解,这个注解相当于同时添加@Controller 和@ResponseBody 注解。
@EnableAutoConfiguration
Spring Boot 建议只有一个带有该注解的类。
@EnableAutoConfiguration 作用:Spring Boot 会自动根据你 jar 包的依赖来自动配置项目。 例如当你项目下面有 HSQLDB 的依赖时,Spring Boot 会创建默认的内存数据库的数据源 DataSource,如果你自己创建了 DataSource,Spring Boot 就不会创建默认的 DataSource。
如果你不想让 Spring Boot 自动创建,你可以配置注解的 exclude 属性,例如:
1 |
|
@SpringBootApplication
由于大量项目都会在主要的配置类上添加 @Configuration,@EnableAutoConfiguration,@ComponentScan 三个注解。
因此 Spring Boot 提供了@SpringBootApplication 注解,该注解可以替代上面三个注解(使用 Spring 注解继承实现)。
启动项目 SpringApplication.run
启动 Spring Boot 项目最简单的方法就是执行下面的方法:
1 | SpringApplication.run(Application.class, args); |
该方法返回一个 ApplicationContext 对象,使用注解的时候返回的具体类型是 AnnotationConfigApplicationContext 或 AnnotationConfigEmbeddedWebApplicationContext,当支持web的时候是第二个。
除了上面这种方法外,还可以用下面的方法:
1 | SpringApplication application = new SpringApplication(Application.class); |
SpringApplication 包含了一些其他可以配置的方法,如果你想做一些配置,可以用这种方式。
除了上面这种直接的方法外,还可以使用 SpringApplicationBuilder:
1 | new SpringApplicationBuilder() |
当使用 SpringMVC 的时候由于需要使用子容器,就需要用到 SpringApplicationBuilder,该类 有一个 child(xxx…)方法可以添加子容器。
运行
在 IDE 中直接直接执行 main 方法,然后访问 http://localhost:8080 即可。 另外还可以用上面提到的 mvn,可以打包为可执行 jar 包,然后执行java -jar xxx.jar。 或者执行mvn spring-boot:run运行项目。
Spring Boot 属性配置和使用
Spring Boot 允许通过外部配置让你在不同的环境使用同一应用程序的代码,简单说就是
可以通过配置文件来注入属性或者修改默认的配置。
Spring Boot 支持多种外部配置方式
这些方式优先级如下:
- 命令行参数
- 来自 java:comp/env 的 JNDI 属性
- Java 系统属性(System.getProperties())
- 操作系统环境变量
- RandomValuePropertySource 配置的 random.*属性值
- jar 包外部的 application-{profile}.properties 或 application.yml(带 spring.profile)配置文件
- jar 包内部的 application-{profile}.properties 或 application.yml(带 spring.profile)配置文件
- jar 包外部的 application.properties 或 application.yml(不带 spring.profile)配置文件
- jar 包内部的 application.properties 或 application.yml(不带 spring.profile)配置文件
- @Configuration 注解类上的@PropertySource
- 通过 SpringApplication.setDefaultProperties 指定的默认属性
命令行参数
通过 java -jar app.jar --name="Spring" --server.port=9090 方式来传递参数。
参数用–xxx=xxx 的形式传递。
可以使用的参数可以是我们自己定义的,也可以是 Spring Boot 中默认的参数。 很多人可能会关心如 web 端口如何配置这样的问题,这些都是 Spring Boot 中提供的参数, 部分可用参数如下:
1 | # LOGGING |
更多常见的应用属性请浏览这里
注意:命令行参数在 app.jar 的后面!
可以通过 SpringApplication.setAddCommandLineProperties(false)禁用命令行配置。
Java 系统属性
注意 Java 系统属性位置 java -Dname=“isea533” -jar app.jar,可以配置的属性都是一样的,优 先级不同。
例如 java -Dname="isea533" -jar app.jar --name="Spring!"中 name 值为 Spring!
操作系统环境变量
配置过 JAVA_HOME 的应该都了解这一个。
这里需要注意的地方,有些 OS 可以不支持使用.这种名字,如 server.port,这种情况可以使 用 SERVER_PORT 来配置。
RandomValuePropertySource
系统中用到随机数的地方,例如:
1 | my.secret=${random.value} |
应用配置文件(.properties 或.yml)
在配置文件中直接写:
1 | name=Isea533 |
- yml 格式的配置文件如:
1 | name: Isea533 |
当有前缀的情况下,使用.yml 格式的配置文件更简单。关于.yml 配置文件用法请看这里。
注意:使用.yml 时,属性名的值和冒号中间必须有空格,如 name: Isea533 正确,name:Isea533 就是错的。
属性配置文件的位置
spring 会从 classpath 下的/config 目录或者 classpath 的根目录查找 application.properties 或 application.yml。
/config 优先于 classpath 根目录
@PropertySource
这个注解可以指定具体的属性配置文件,优先级比较低。
SpringApplication.setDefaultProperties
例如:
1 | SpringApplication application = new SpringApplication(Application.class); |
应用(使用)属性
@Value(“${xxx}”)
这种方式是最简单的,通过@Value 注解可以将属性值注入进来。
@ConfigurationProperties
Spring Boot 可以方便的将属性注入到一个配置对象中。例如:
my.name=Isea533
my.port=8080
my.servers[0]=dev.bar.com
my.servers[1]=foo.bar.com
对应对象:
1 |
|
Spring Boot 会自动将prefix="my"前缀为my的属性注入进来。
Spring Boot 会自动转换类型,当使用List的时候需要注意在配置中对List进行初始化!
Spring Boot 还支持嵌套属性注入,例如:
  name=isea533
  jdbc.username=root
  jdbc.password=root
 ...
对应的配置类:
1 |
|
jdbc 开头的属性都会注入到 Jdbc 对象中。
在@Bean 方法上使用@ConfigurationProperties
例如:
1 |
|
Spring Boot 会将 foo 开头的属性按照名字匹配注入到 FooComponent 对象中。
属性占位符
例如:
1 | app.name=MyApp |
可以在配置文件中引用前面配置过的属性(优先级前面配置过的这里都能用)。
通过如{}方式会被 Maven 处理。如果你 pom 继承的 spring-boot-starter-parent, Spring Boot已经将 maven-resources-plugins 默认的${}方式改为了@ @方式,例如 @name@。
如果你是引入的 Spring Boot,你可以修改使用其他的分隔符.
通过属性占位符还能缩短命令参数
例如修改 web 默认端口需要使用–server.port=9090 方式,如果在配置中写上:
server.port=${port:8080}
那么就可以使用更短的–port=9090,当不提供该参数的时候使用默认值 8080。
属性名匹配规则
例如有如下配置对象:
1 |
|
firstName 可以使用的属性名如下:
- person.firstName,标准的驼峰式命名
- person.first-name,虚线(-)分割方式,推荐在.properties 和.yml 配置文件中使用
- PERSON_FIRST_NAME,大写下划线形式,建议在系统环境变量中使用.
属性验证
可以使用 JSR-303 注解进行验证,例如:
1 |
|
最后
以上是 Spring Boot 属性配置和使用的内容,有些不全面的地方或者读者有更多疑问,可以
查看 Spring Boot 完整文档 或 Externalized Configuration。
SpringBoot集成MyBatis
Spring Boot 集成 druid
druid 有很多个配置选项,使用 Spring Boot 的配置文件可以方便的配置 druid。
在 application.yml 配置文件中写上:
1 | spring: |
这里通过 type: com.alibaba.druid.pool.DruidDataSource 配置即可!
Spring Boot 集成 MyBatis
Spring Boot 集成 MyBatis 有两种方式,一种简单的方式就是使用 MyBatis 官方提供的: mybatis-spring-boot-starter
另外一种方式就是仍然用类似 mybatis-spring 的配置方式,这种方式需要自己写一些代 码,但是可以很方便的控制 MyBatis 的各项配置。
mybatis-spring-boot-starter 方式
在 pom.xml 中添加依赖:
1 | <dependency> |
mybatis-spring-boot-starter 依赖树如下:
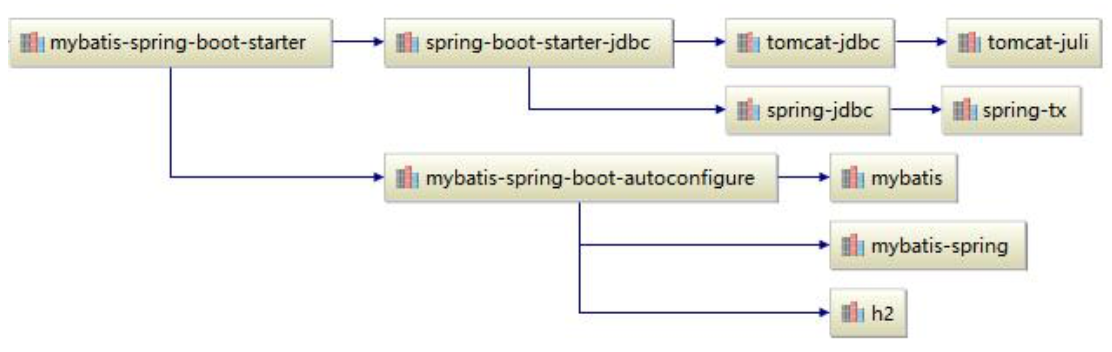
其中 mybatis 使用的 3.3.0 版本,可以通过:
<mybatis.version>3.3.0</mybatis.version>属性修改默认版本。
mybatis-spring 使用版本 1.2.3,可以通过:
<mybatis-spring.version>1.2.3</mybatis-spring.version>修改默认版本。
在 application.yml 中增加配置:
1 | mybatis: |
除了上面常见的两项配置,还有:
mybatis.config:mybatis-config.xml 配置文件的路径
mybatis.typeHandlersPackage:扫描typeHandlers的包
mybatis.checkConfigLocation:检查配置文件是否存在
mybatis.executorType:设置执行模式(SIMPLE, REUSE, BATCH),默认为 SIMPLE
mybatis-spring 方式
这种方式和平常的用法比较接近。需要添加 mybatis 依赖和 mybatis-spring 依赖。
然后创建一个 MyBatisConfig 配置类:
1 | /** |
上面代码创建了一个 SqlSessionFactory 和一个 SqlSessionTemplate,为了支持注解事 务,增加了@EnableTransactionManagement 注解,并且反回了一个
PlatformTransactionManagerBean。
另外应该注意到这个配置中没有 MapperScannerConfigurer,如果我们想要扫描 MyBatis 的 Mapper 接口,我们就需要配置这个类,这个配置我们需要单独放到一个类中。
1 | /** |
这个配置一定要注意@AutoConfigureAfter(MyBatisConfig.class),必须有这个配置, 否则会有异常。原因就是这个类执行的比较早,由于 sqlSessionFactory 还不存在,后续
执行出错。做好上面配置以后就可以使用 MyBatis 了。
关于分页插件和通用 Mapper 集成
分页插件作为插件的例子在上面代码中有。
通用 Mapper 配置实际就是配置 MapperScannerConfigurer 的时候使用 tk.mybatis.spring.mapper.MapperScannerConfigurer即可,配置属性使用 Properties。
Spring Boot 集成 MyBatis 的基础项目
项目地址:https://github.com/wudongqiang/MyBatis-Spring-Boot
分页插件和通用 Mapper 的相关信息可以通过上面地址找到。
Spring Boot 静态资源处理
Spring Boot 默认的处理方式就已经足够了,默认情况下 Spring Boot 使用 WebMvcAutoConfiguration 中配置的各种属性。
建议使用 Spring Boot 默认处理方式,需要自己配置的地方可以通过配置文件修改。 但是如果你想完全控制 Spring MVC,你可以在@Configuration 注解的配置类上增加 @EnableWebMvc,增加该注解以后 WebMvcAutoConfiguration 中配置就不会生效,你需要自 己来配置需要的每一项。这种情况下的配置方法建议参考 WebMvcAutoConfiguration 类。
本文以下内容针对 Spring Boot 默认的处理方式,部分配置通过在 application.yml 配置 文件中设置。
1.spring boot 默认加载文件的路径是
- /META-INF/resources/
- /resources/
- /static/
- /public/
所有本地的静态资源都配置在了 classpath 下面了, 而非在 webapp 下了
配置资源映射
Spring Boot 默认配置的/映射到/static(或/public ,/resources,
/META-INF/resources),/webjars/会映射到 classpath:/META-INF/resources/webjars/。
注意:上面的/static 等目录都是在 classpath:下面。 如果你想增加如/mystatic/**映射到 classpath:/mystatic/,你可以让你的配置类继承WebMvcConfigurerAdapter,然后重写如下方法:
1 |
|
这种方式会在默认的基础上增加/mystatic/**映射到classpath:/mystatic/,不会影响 默认的方式,可以同时使用。
静态资源映射还有一个配置选项,为了简单这里用.properties 方式书写:
1 | spring.mvc.static-path-pattern=/** # Path pattern used for static resources. |
这个配置会影响默认的/**,例如修改为/static/**后,只能映射如 /static/js/sample.js这样的请求(修改前是/js/sample.js)。这个配置只能写一个值,不像大多数可以配置多个用逗号隔开的
使用注意
例如有如下目录结构:
1 | └─resources |
在 index.ftl 中该如何引用上面的静态资源呢?
如下写法:
1 | <link rel="stylesheet" type="text/css" href="/css/index.css"> |
注意:默认配置的/**映射到/static(或/public ,/resources,/META-INF/resources) 当请求/css/index.css的时候,Spring MVC 会在/static/目录下面找到。
如果配置为/static/css/index.css,那么上面配置的几个目录下面都没有/static 目录, 因此会找不到资源文件!
所以写静态资源位置的时候,不要带上映射的目录名(如/static/,/public/, /resources/,/META-INF/resources/)!
使用 WebJars
WebJars:http://www.webjars.org/
例如使用 jquery,添加依赖:
1 | <dependency> |
然后可以如下使用:
1 | <script type="text/javascript" src="/webjars/jquery/1.11.3/jquery.js"></script> |
你可能注意到 href 中的 1.11.3 版本号了,如果仅仅这么使用,那么当我们切换版本号的时 候还要手动修改 href,怪麻烦的,我们可以用如下方式解决。
先在 pom.xml 中添加依赖:
1 | <dependency> |
增加一个 WebJarController:
1 |
|
然后使用的时候按照如下方式:
1 | <script |
注意:这里不需要在写版本号了,但是注意写 url 的时候,只是在原来 url 基础上去掉了版 本号,其他的都不能少!
静态资源版本管理
Spring MVC 提供了静态资源版本映射的功能。
用途:当我们资源内容发生变化时,由于浏览器缓存,用户本地的静态资源还是旧的资源, 为了防止这种情况导致的问题,我们可能会手动在请求 url 的时候加个版本号或者其他方式。
版本号如:
1 | <script |
Spring MVC 提供的功能可以很容易的帮助我们解决类似问题。
Spring MVC 有两种解决方式。
注意:下面的配置方式针对 freemarker 模板方式,其他的配置方式可以参考。
资源名-md5 方式
1 | <link rel="stylesheet" type="text/css" href="/css/index-2b371326aa93ce4b611853a309b69b29.css"> |
Spring 会自动读取资源 md5,然后添加到 index.css 的名字后面,因此当资源内容发生变化 的时候,文件名发生变化,就会更新本地资源。
配置方式:
在 application.properties 中做如下配置:
spring.resources.chain.strategy.content.enabled=true
spring.resources.chain.strategy.content.paths=/**
这样配置后,所有/**请求的静态资源都会被处理为上面例子的样子。 到这儿还没完,我们在写资源 url 的时候还要特殊处理。
首先增加如下配置:
1 |
|
然后在页面写的时候用下面的写法:
1 | <link rel="stylesheet" type="text/css" href="${urls.getForLookupPath('/css/index.css')}"> |
使用 urls.getForLookupPath(‘/css/index.css’)来得到处理后的资源名。
版本号 方式
在 application.properties 中做如下配置:
spring.resources.chain.strategy.fixed.enabled=true
spring.resources.chain.strategy.fixed.paths=/js/,/v1.0.0/
spring.resources.chain.strategy.fixed.version=v1.0.0
这里配置需要特别注意,将 version 的值配置在 paths 中。 在页面写的时候,写法如下:
1 | <script |
注意,这里仍然使用了 urls.getForLookupPath,urls 配置方式见上一种方式。
在请求的实际页面中,会显示为:
1 | <script |
可以看到这里的地址是/v1.0.0/js/index.js。
静态资源版本管理 处理过程
在 Freemarker 模板首先会调用 urls.getForLookupPath 方法,返回一个
/v1.0.0/js/index.js 或/css/index-2b371326aa93ce4b611853a309b69b29.css。 这时页面上的内容就是处理后的资源地址。这之后浏览器发起请求。
这里分开说。
- 第一种md5方式
请 求 /css/index-2b371326aa93ce4b611853a309b69b29.css , 我们 md5 配置的
paths=/**,所以 Spring MVC 会尝试 url 中是否包含-,如果包含会去掉后面这部分,然
后去映射的目录(如/static/)查找/css/index.css 文件,如果能找到就返回。
- 第二种版本方式
请求/v1.0.0/js/index.js。
如果我们 paths 中没有配置/v1.0.0,那么上面这个请求地址就不会按版本方式来处理,因 此会找不到上面的资源。
如果配置了/v1.0.0,Spring 就会将/v1.0.0去掉再去找/js/index.js,最终会在 /static/下面找到。
 wechat
 alipay