Hadoop系列:独立模式standalone(一)
Hadoop概要
Hadoop是一个分布式的软件框架。拥有云计算的PasS层的所有的特点,是云计算的重要组成部分。Hadoop的两大核心组成部分为:分布式文件系统HDFS和分布式计算框架MapReduce。
- 1.海量数据的摇篮–HDFS
作为Hadoop分布式文件系统,HDFS处于Hadoop生态圈的最下层,存储着所有的数据,支持者Hadoop的所有服务。它的理论基础源于Google的The Google File System这篇论文,是GFS的开源实现。
HDFS的设计理念是以流失数据访问模式,存储超大文件,运行于廉价的硬件集群之上。
- 2.处理海量数据的利器–MapReduce
MapReduce是一种编程模型,Hadoop根据Google的MapReduce论文将其实现,作为Hadoop的分布式计算模型,是Hadoop的核心。
Hadoop安装
下载解压
从Hadoop官网选择合适的版本,下载解压。
1 | wget http://www.apache.org/dyn/closer.cgi/hadoop/common/hadoop-2.8.0/hadoop-2.8.0.tar.gz |
解压之后,在hadoop的根目录(后面不做特殊说明,全部使用$HADOOP_HOME代替),配置相关文件。Hadoop为了保险,解压之后默认的配置就是独立模式,即本地模式。
配置
Hadoop的配置文件在$HADOOP_HOME/etc/hadoop/下面。
| 文件名称 | 格式 | 描述 |
|---|---|---|
| hadoop-env.sh | Bash脚本 | 记录Hadoop要用的环境变量 |
| core-site.xml | Hadoop配置XML | Hadoop Core 的配置项,例如HDFS和MapReduce的常用I/O设置等。 |
| hdfs-site.xml | Hadoop配置XML | HDFS守护进程的配置项,包括NameNode、SecondaryNameNode、DataNode等。 |
| mapred-site.xml | MapReuce配置XML | MapReduce守护进程配置项 |
| masters | 纯文本 | 运行SecondaryNameNode的机器列表 |
| slaves | 纯文本 | 运行DataNode和TaskNode的机器列表 |
| log4j.properties | properties文件 | 系统日志文件 |
| yarn-site.xml | yarn配置XML | ResourceManager、NodeManager资源配置 |
其他文件,没有过多的涉及,暂时不作说明。
我们做简单的配置:
配置之前,先配置hosts:增加127.0.0.1 master,然后创建相应的hadoop的name和data以及tmp的本地存放路径。下面假设文件路径均已创建。
(1)修改core-site.xml,增加HSDF主机和端口的配置,这里配置9000端口提供服务。fs.default.name配置不仅仅指明了提供服务的主机和端口,还指明了NameNode所运行的节点,即主节点。
1 |
|
(2)修改hdfs-site.xml,dfs.replication配置项设置HDFS中文件副本数,此处设置1,表示没有副本数。如果设置为3,表示有2个副本。HDFS会自动对文件做冗余处理。建议,应该小于等于机器数。dfs.name.dir配置项设置NameNode的元数据存放的本地文件系统路径,dfs.data.dir设置DataNode存放数据的本地文件系统路径。
1 |
|
(3)修改mapred-site.xml.
mapreduce.framework.name配置项,新框架支持第三方 MapReduce 开发框架以支持如 SmartTalk/DGSG 等非 Yarn 架构,注意通常情况下这个配置的值都设置为 Yarn,如果没有配置这项,那么提交的 Yarn job 只会运行在 locale 模式,而不是分布式模式。
mapreduce.jobhistory.address配置项指明了job的历史,yarn要读取jobhistory信息来获取是否执行成功。
mapreduce.jobhistory.webapp.address配置项指定了jobhistory的管理主机和端口。在hadoop启动后,可以使用下面命令开启JobHistoryServer,然后可以在浏览器中访问:`http://master:19888/``
1 | ./sbin/mr-jobhistory-daemon.sh start historyserver |
设置提供MapReduce服务的主机和端口号,也就是说由127.0.0.1的9001端口提供MapReduce服务,该配置也指明了JobTracker所运行的节点。
1 |
|
(4)配置yarn-site.xml.
1 |
|
(5)配置环境变量:
首先修改HADOOP_HOME/etc/hadoop/mapred-env.sh和yarn-env.sh中的JAVA_HOME的路径。
在~/.bash_profile中配置java和hadoop的环境变量。一定要配置$JAVA_HOME变量,在yarn-env.sh和hadoop-env.sh中都在使用。
1 | export JAVA_HOME=/Library/Java/JavaVirtualMachines/jdk1.8.0_111.jdk/Contents/Home |
注意:由于MacOsx的java可以使用控制平台安装,安装之后java bin文件直接安装到/usr/bin/目录下。使用命令ls -la /usr/bin | grep java*查看,可以看到是一个软连接,类似:lrwxr-xr-x 1 root wheel 74 12 18 21:32 java -> /System/Library/Frameworks/JavaVM.framework/Versions/Current/Commands/java,但是我们的我们使用find查找tools.jar,发现并不在/System/Library/Frameworks/JavaVM.framework/Versions/目录下,而是在/Library/Java/JavaVirtualMachines/jdk1.8.0_111.jdk/Contents/Home/这个目录下面。
1 | export HADOOP_HOME=/Users/hadoop/Documents/software/hadoop-2.8.0 |
启动
在hadoop的目录,执行脚本./sbin/start-all.sh则可以启动NameNode、SecondaryNameNode、DataNode以及ResourceManager和NodeManager。
但是在初次执行之前,一定需要初始化NameNode。并且给./bin/*和./sbin/*下的二进制文件和脚本文件给予可执行权限。给fs.name.dir和fs.data.dir给予可写权限(至少755)。
1 | ./bin/hadoop namenode -format |
启动成功后,使用jps命令可以看到java相关进程:
NameNode
DataNode
SecondaryNameNode
ResourceManager
NodeManager
运行DEMO
1 | hadoop fs -mkdir /input |
错误总结
I.执行hadoop脚本的异常
1 | ./sbin/start-all.sh |
错误1:
0.0.0.0: secondarynamenode running as process 1031. Stop it first.
17/04/12 22:37:05 WARN util.NativeCodeLoader: Unable to load native-hadoop library for your platform… using builtin-java classes where applicable
解决方法:编译对应版本的hadoop源码,将编译好的native/lib替换已有的hadoop下面的lib。
II.编译hadoop源码
1 | mvn package -Dmaven.javadoc.skip=true -Pdist,native -DskipTests -Dtar |
错误2:
[ERROR] Failed to execute goal org.apache.hadoop:hadoop-maven-plugins:2.8.0:protoc (compile-protoc) on project hadoop-common: org.apache.maven.plugin.MojoExecutionException: ‘protoc --version’ did not return a version -> [Help 1]
[ERROR]
[ERROR] To see the full stack trace of the errors, re-run Maven with the -e switch.
[ERROR] Re-run Maven using the -X switch to enable full debug logging.
[ERROR]
[ERROR] For more information about the errors and possible solutions, please read the following articles:
[ERROR] [Help 1] http://cwiki.apache.org/confluence/display/MAVEN/MojoExecutionException
[ERROR]
[ERROR] After correcting the problems, you can resume the build with the command
[ERROR] mvn-rf :hadoop-common
经过查找原因,适用于没有没有安装 protoc,在官网提示为:NOTE: You will need protoc installed.参考
III.解决错误2:安装protoc
从github上拉去源码:参考
1 | ./autogen.sh |
错误3:
Can’t exec “aclocal”: No such file or directory at /usr/local/Cellar/autoconf/2.69/share/autoconf/Autom4te/FileUtils.pm line 326.
autoreconf: failed to run aclocal: No such file or directory
缺少aclocal命令,安装:
1 | brew install m4 |
参考文章:《GNU autotools的安装和使用 (MacPorts安装和使用)》
上面这篇文章给出了port安装的方法:
安装顺序是M4 -> autoconf -> automake (很重要!!!!)
执行以下命令进行安装:
sudo port install M4
sudo port install autoconf
sudo port install automake执行完上述命令后就安装完了以下5个工具:
GNU Autotools指的就是下面的五个工具:
(1)aclocal
(2)autoscan
(3)autoconf
(4)autoheader
(5)automake
错误4:
Can’t exec “glibtoolize”: No such file or directory at /usr/local/Cellar/autoconf/2.69/share/autoconf/Autom4te/FileUtils.pm line 345,
line 6.
autoreconf: failed to run glibtoolize: No such file or directory
autoreconf: glibtoolize is needed because this package uses Libtool
错误是缺少glibtoolize库,其实MacOsx中存在一个Mach-O动态库:libtool,/Applications/Xcode.app/Contents/Developer/Toolchains/XcodeDefault.xctoolchain/usr/bin/libtool,我们需要单独安装一个libtool。
- 解决方式1:在
autogen.sh中增加下面的脚本:
1 | case `uname` in Darwin*) glibtoolize --copy ;; |
参考文章:《installed libtool but libtoolize not found》
引文说的比较透彻:
You typically need to use glibtool and glibtoolize, since libtool already exists on OS X as a binary tool for creating Mach-O dynamic libraries. So, that’s how MacPorts installs it, using a program name transform, though the port itself is still named ‘libtool’.
Some autogen.sh scripts (or their equivalent) will honor the LIBTOOL / LIBTOOLIZE environment variables. I have a line in my own autogen.sh scripts:
2
*) libtoolize --copy ;; esacYou may or may not want the --copy flag.
- 解决方式2:安装libtool
执行下面的命令:
1 | brew install libtool |
安装完成,提示:
In order to prevent conflicts with Apple’s own libtool we have prepended a “g”
so, you have instead: glibtool and glibtoolize.
为了避免与Apple自定的libtool冲突,我们前面加了一个"g"来区分,所以,你安装的是glibtool和glibtoolize。
错误5:
Google Mock not present. Fetching gmock-1.7.0 from the web…
% Total % Received % Xferd Average Speed Time Time Time Current Dload Upload Total Spent Left Speed
100 129 0 129 0 0 124 0 --:–:-- 0:00:01 --:–:-- 124
100 362k 100 362k 0 0 71604 0 0:00:05 0:00:05 --:–:-- 94397
% Total % Received % Xferd Average Speed Time Time Time Current Dload Upload Total Spent Left Speed
100 129 0 129 0 0 130 0 --:–:-- --:–:-- --:–:-- 130
100 618k 100 618k 0 0 153k 0 0:00:04 0:00:04 --:–:-- 292k
- autoreconf -f -i -Wall,no-obsolete
/usr/local/bin/glibtoolize: line 406: /usr/local/Library/ENV/4.3/sed: No such file or directory
/usr/local/bin/glibtoolize: line 2513: /usr/local/Library/ENV/4.3/sed: No such file or directory
/usr/local/bin/glibtoolize: line 2513: /usr/local/Library/ENV/4.3/sed: No such file or directory
/usr/local/bin/glibtoolize: line 3601: /usr/local/Library/ENV/4.3/sed: No such file or directory
/usr/local/bin/glibtoolize: line 3845: /usr/local/Library/ENV/4.3/sed: No such file or directory
/usr/local/bin/glibtoolize: line 861: /usr/local/Library/ENV/4.3/sed: No such file or directory
: putting auxiliary files in ‘…/…’.
: copying file ‘…/…/ltmain.sh’
/usr/local/bin/glibtoolize: line 3771: /usr/local/Library/ENV/4.3/sed: No such file or directory
configure.ac:27: installing ‘build-aux/compile’
configure.ac:30: installing ‘build-aux/config.guess’
configure.ac:30: installing ‘build-aux/config.sub’
configure.ac:24: installing ‘build-aux/install-sh’
configure.ac:30: error: required file ‘build-aux/ltmain.sh’ not found
configure.ac:24: installing ‘build-aux/missing’
Makefile.am: installing ‘build-aux/depcomp’
parallel-tests: installing ‘build-aux/test-driver’
autoreconf: automake failed with exit status: 1
错误原因是/usr/local/bin/glibtoolize这个文件中找不到/usr/local/Library/ENV/4.3/sed,使用find命令查找sed:
1 | find / -name sed |
输出信息:
/.MobileBackups/Computer/2017-04-07-092839/Volume/usr/bin/sed
find: /dev/fd/protobuf: No such file or directory
find: /dev/fd/protobuf: No such file or directory
/usr/bin/sed
/usr/local/Homebrew/Library/Homebrew/shims/super/sed
修改/usr/local/bin/glibtoolize中的sed路径即可。
1 | sudo vim /usr/local/bin/glibtoolize |
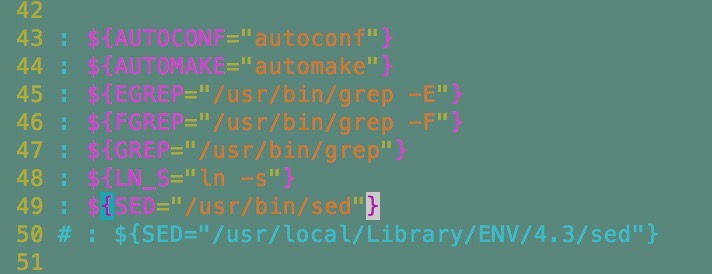
替换:
1 | # : ${SED="/usr/local/Library/ENV/4.3/sed"} |
正式安装protoc、编译hadoop源码
1 | ./autogen.sh |
这一次正常,没有任何错误。
1 | + autoreconf -f -i -Wall,no-obsolete |
执行./configure.默认安装路径:
configure: running /bin/sh ./configure --disable-option-checking ‘–prefix=/usr/local’ --cache-file=/dev/null --srcdir=.
执行下面的命令开始编译和安装:
1 | make |
安装完成后,执行下面的命令查看是否安装成功:
1 | which protoc |
编译时再次报错
[ERROR] Failed to execute goal org.apache.hadoop:hadoop-maven-plugins:2.8.0:protoc (compile-protoc) on project hadoop-common: org.apache.maven.plugin.MojoExecutionException: protoc version is ‘libprotoc 3.2.0’, expected version is ‘2.5.0’ -> [Help 1]
[ERROR]
[ERROR] To see the full stack trace of the errors, re-run Maven with the -e switch.
[ERROR] Re-run Maven using the -X switch to enable full debug logging.
[ERROR]
[ERROR] For more information about the errors and possible solutions, please read the following articles:
[ERROR] [Help 1] http://cwiki.apache.org/confluence/display/MAVEN/MojoExecutionException
[ERROR]
[ERROR] After correcting the problems, you can resume the build with the command
[ERROR] mvn-rf :hadoop-common
libprotoc版本不兼容,期望的版本是2.5.0,提供的版本是3.2.0。
解决方法:下载protobuf2.5.0版本,重复上面的解决方式。
【附】
1.0.20.X 配置和 Hadoop 0.23.X 配置的区别
| 配置文件 | 配置项 Hadoop | 0.20.X 配置 | Hadoop 0.23.X 配置 | 说明 |
|---|---|---|---|---|
| core-site.xml | 系统默认分布式文件 URI | fs.default.name | fs.defaultFS | |
| hdfs-site.xml | DFS name node 存放 name table 的目录 | dfs.name.dir | dfs.namenode.name.dir | 新框架中 name node 分成 dfs.namenode.name.dir( 存放 naname table 和 dfs.namenode.edits.dir(存放 edit 文件),默认是同一个目录 |
| DFS data node 存放数据 block 的目录 | dfs.data.dir | dfs.datanode.data.dir | 新框架中 DataNode 增加更多细节配置,位于 dfs.datanode. 配置项下,如 dfs.datanode.data.dir.perm(datanode local 目录默认权限);dfs.datanode.address(datanode 节点监听端口);等 | |
| 分布式文件系统数据块复制数 | dfs.replication dfs.replication | 新框架与老框架一致,值建议配置为与分布式 cluster 中实际的 DataNode 主机数一致 | ||
| mapred-site.xml | Job 监控地址及端口 | mapred.job.tracker | 无 | 新框架中已改为 Yarn-site.xml 中的 resouceManager 及 nodeManager 具体配置项,新框架中历史 job 的查询已从 Job tracker 剥离,归入单独的 mapreduce.jobtracker.jobhistory 相关配置, |
| 第三方 MapReduce 框架 | 无 | mapreduce.framework.name | 新框架支持第三方 MapReduce 开发框架以支持如 SmartTalk/DGSG 等非 Yarn 架构,注意通常情况下这个配置的值都设置为 Yarn,如果没有配置这项,那么提交的 Yarn job 只会运行在 locale 模式,而不是分布式模式。 | |
| Yarn-site.xml | The address of the applications manager interface in the RM | 无 | Yarn.resourcemanager.address | 新框架中 NodeManager 与 RM 通信的接口地址 |
| The address of the scheduler interface | 无 | Yarn.resourcemanager.scheduler.address | 同上,NodeManger 需要知道 RM 主机的 scheduler 调度服务接口地址 | |
| The address of the RM web application | 无 | Yarn.resourcemanager.webapp.address | 新框架中各个 task 的资源调度及运行状况通过通过该 web 界面访问 | |
| The address of the resource tracker interface | 无 | Yarn.resourcemanager.resource-tracker.address | 新框架中 NodeManager 需要向 RM 报告任务运行状态供 Resouce 跟踪,因此 NodeManager 节点主机需要知道 RM 主机的 tracker 接口地址 |
 wechat
 alipay